
Robot Mower Boundary Wire + Tips for Installation
 As you have learned in our comprehensive robot lawn mower buying guide, there are boundary cables to define or limit the mowing area. The robot mower recognizes the boundary cable (also known as boundary wire) through induction and does not go beyond that point. Of course, a closed circuit is necessary for this to work. We provide a comprehensive overview and tips for laying the boundary cable.
» Best robot mower boundary wires
This unpleasant task is something every robot mower owner will have to face eventually. However, this task is not always easy for particularly intricate areas or even multiple separate areas, and requires some background knowledge and planning. So, don’t just unpack and start without a functioning circuit for the boundary cable – otherwise, your lawn mower will quickly end up in your neighbor’s garden.
To make your life easier, we want to provide you with some tips in this guide on how to quickly and efficiently lay the boundary wire for your robotic lawnmower. This task can be daunting, especially for complex or multiple areas, but with some background knowledge and planning, it can be done easily. It is important to have a functioning circuit for the boundary wire. Otherwise, the lawn mower will not work properly and may end up in your neighbor’s garden.
The Functioning of the Boundary Wire
First of all, it should be mentioned that the boundary cable is actually nothing more than a power cable with a cross-section of about 1-2 mm. The cable is connected to the charging station at two ends. The charging station, in turn, is connected to the power grid and puts the cable under voltage. This closes the circuit – creating a magnetic field that is detected by the lawn mower robot through certain sensors. Within this defined area, the lawn mower robot moves and cannot go beyond it.
The whole thing sounds simple, but in practice, the user is faced with a series of questions:
- Do I need to make any preparations before laying the boundary wire?
- What tools can I use to lay the boundary wire?
- Do I need to lay the boundary wire above or below ground level?
- What do I have to pay attention to during the installation process? Can I make mistakes?
- What distances do I have to maintain between obstacles?
- How can I properly include multiple areas (main and secondary areas)?
Preparations before laying the boundary cable
The postman rings and the package with the lawn mower robot has arrived! Of course, you want to start right away and test what the little helper can do. But you shouldn’t rush or approach the matter without a plan. Good preparation is everything!
Even before you even touch the package, you should consider and take care of the following things.
Installing a Robot Lawn Mower boundary wire – Here’s How to Do It:
-
The planning
Before installing the boundary wire, walk around your lawn to determine which areas the lawn mower should or can mow. It’s best to sketch out a diagram of your lawn and plan where the boundary wire should be placed. This will make the job on the lawn much easier later on. The width of the corridor and the presence of multiple separate areas should also be considered during the planning phase.
-
The corridor width

Source:NeueLandschaft
The lawn mower robot is slim, but it still needs space to maneuver. Depending on the model, the width of a certain lawn area must not be undercut. Here, 1 meter has proven to be a good guideline. Simply check your user manual. Also remember: practice makes perfect! Adjacent and separate areas.
-
Lawn mowing
Before you start laying the boundary cable, you should mow the entire lawn first. This is because the lawn mower can only cut short grass, and also because you can see all the objects lying around that should be removed before installation. You can also see any holes in the lawn where the boundary cable cannot lie flat. If the cable is not lying flat, there is a risk that the lawn mower will cut it.

Is a boundary wire universally applicable?
Many people who have previously used a lawn mower robot may not necessarily want to lay a new boundary cable for a new model. But is that even necessary? Since the boundary cable is a simple cable with a plastic coating, it may seem at first glance that it can be used universally. However, there are differences in the type of metal (alloy) as well as in the cross-section or thickness of the cable.
However, it is especially important to consider the distance that the boundary wire must have from the edge of the lawn area. This distance varies among different manufacturers, so it cannot be answered universally whether a boundary wire can be used for a new model. For universal boundary wires, the description usually includes compatible mower manufacturer and model information.
How to extend the boundary cable

You may want to expand the mowing area and therefore need to extend the boundary wire, or if the boundary wire has been damaged, the so-called wire connectors or terminal clamps are designed for this purpose.
With their help, extending or repairing the boundary wire is quick and uncomplicated. Simply insert the ends of the wire into the wire connector and push the device down so that both wires are electrically connected. Afterward, you can check whether the charging station shows a closed circuit again or whether the corresponding error message disappears.
Conclusion on the lawn mower boundary wire
Before unpacking and starting to use the boundary wire for your robotic lawn mower, you need to know how to lay it. As mentioned in our robot mower buying guide, there are two different methods for laying the boundary wire: the above-ground and the underground method.
We recommend starting with the above-ground method, as it takes only a fraction of the time to set up.
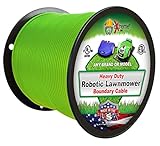
The best boundary wires for robot lawn mowers
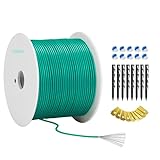
![JAVEX Robotic Mower Boundary Wire- Tinned Copper Heavy Duty Universal for Husqvarvna, Worx and Other Lawn Auto-Mower Brands Installation Kit [3.4mm, 24x0.25mm] Green, 153M/500FT](https://robot-lawn-mower.net/wp-content/uploads/2017/06/41UULDIzk9L._SL160_.jpg)


* Ad / Image: Amazon Associates
Video: Laying the boundary wire for a robotic lawn mower

By loading the video, you agree to YouTube's privacy policy.
Learn more